Microsoft Teams Guide

How to Create an Account?

A) For desktop

1. Go to the Microsoft Teams Webpage ( https://www.microsoft.com/en-us/microsoft-365/microsoft-teams/group-chat-software) and click on the profile icon at the top-right corner of the screen.

2. In the “Sign in” page that appears, click on the “Create one!” link to set up a new account.

3. On the “Create account” window, enter your email address (preferably a work email address) and click on the “Next” button.

4. Follow the on-screen instructions to create a password and enter your details on the pages that follow.

B) For mobile

To create a Microsoft account on your mobile, download the app and follow the same instructions mentioned above.

How to Download Microsoft Teams App?

A) For desktop

1. To download the Microsoft Teams desktop app, return to the Microsoft Teams web page and click on “Download Teams” at the top of your screen.

2. Click on the “Download for desktop” button to page jump to the download link for either Mac OS or Windows, depending upon your system.
This link will show up as “Download Teams.” Click on this to proceed with your download.

3. Open the downloaded file and follow the instructions provided to install Microsoft Teams.

B) For mobile

  1. Download the Microsoft Teams app from the iOS App Store or Google Play Store for Android.
  2. Once installed, open the app and log in to your Microsoft account to start using Microsoft Teams.

How To Create Teams And Channels?

In Microsoft Teams, a Team is a group of people who collaborate together, usually consisting of the entire organization.

Meanwhile, Channels are segregated conversations, where each one can be dedicated to a department, project or even a task.

Here are the steps to create teams and channels in Microsoft Teams:

1.Create a team

A) For desktop

1. Open the Microsoft Teams app and click on the “Join or create a team” option at the bottom of the Teams sidebar on the left.

2. On the new screen that appears, click on the “Create team” button.

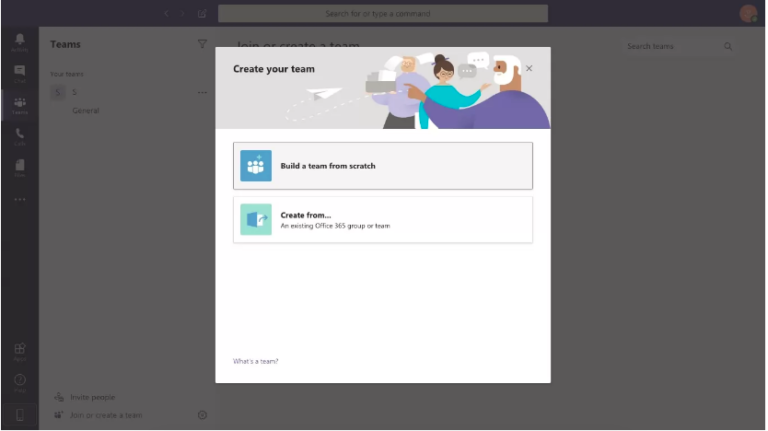
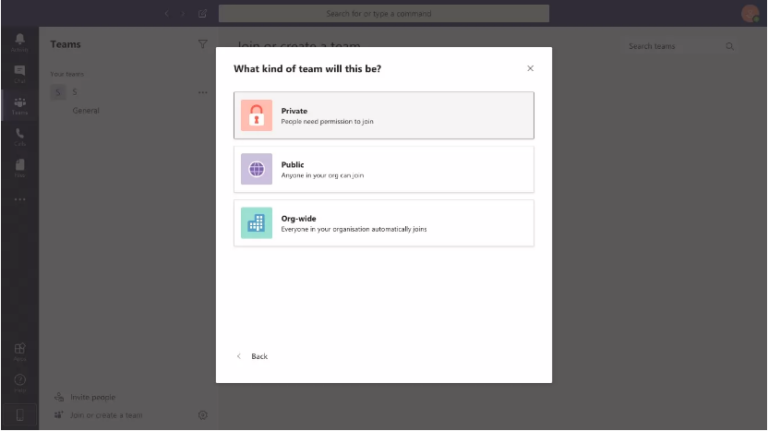
3. On the following screen, you can choose:

Build a team from scratch

Create from an existing Office 365 group or team

If your team was using Office 365 before signing up for Teams, you may have existing groups that can be added using the “Create from…” option.

Otherwise, go with “Build a team from scratch.”


4. Next, define who’s part of the Team.

Make your choice based on how you want to organize your platform:

  • Private: If the team should only have a few specific members, select Private.
  • Public: Best for teams with changing members.
  • Org-Wide: If you want to host your entire organization as one “team” on the platform and use channels to divide departments, Org-wide is the ideal option.

5. Once you’ve chosen the type of team you want to create, you need to give it a name.

Choose an appropriate team name, like “Marketing” or “Social Media”, and then click the “Create” button at the bottom right.


6. Your new team will now appear on the left sidebar of your Teams app (“Marketing” in the image below).

To add members to the team, click on the three dots next to the team name and select “Add member.”

7. Type in the names of the members you want to add.

In case these are “guests” such as external users from outside your organization, you can give them guest access through their email address instead.

B) For mobile

  1. Open the Microsoft Teams app.
  2. Tap on the “Teams” icon at the bottom of the screen, then an icon of “two people and a plus sign” in the top right. You should reach the Manage teams page.
  3. To create your new team, give it a name, add a description and set the privacy settings.

Once you’ve created the team, tap the “More options” icon with three dots and select “Add members.” Type in the names of your team members to add them.

Note: To add groups of people/multiple individuals simultaneously, you need to use the desktop or web app.


2.Create a channel

A) For desktop

Now that you’ve got a team set up, it’s time to add channels.

By default, Microsoft Teams creates a general channel for all team members.

To create additional channels, follow the steps below:

1. Click on the three dots next to the Team you want to create a new channel in, and click on the “Add channel” option.

2. In the pop-up window that appears, you can:

  • Select a channel name.
  • Add a channel description.
  • Change privacy settings to allow access to every team member or only a select few members.

Once you’re done with these settings, click on the “Add” button to create the channel.

B) For mobile

  1. In the mobile app, click on the Teams icon at the bottom.
  2. Tap the three dots (“More options” icon) for the team you want to add to the channel. Then, click on “Manage options.”
  3. Click on “Add +” to begin creating a new channel. Add a name for the channel and a description if you wish to.
  4. To create a standard channel, simply tap “Done.” To create a private channel, tap on “Privacy,” select “Private,” then go back and tap “Done.”
  5. If you chose to create a private channel, the “add members” screen will automatically open up. You can add members at this stage itself, or skip this step and add members later.

How To Set Up Video Conferencing in Microsoft Teams?

A) For desktop

1. Open the Microsoft Teams app, and go to the team/channel you want to hold a video conference with.

Click on the small camera icon under the compose box.

2. If you want, you can add a subject to the video call. Then click the “Meet now” button to start.

3. In the video call screen that appears, you can use the toolbar to turn your camera and microphone on/off, as well as share your screen with everyone who joins the call.

B) For mobile

  1. Open the Microsoft Teams mobile app and go to the chat you want to start a video call with.
  2. In the selected chat, tap “Video call” to start video calling. Participants can answer from either of their desktop or mobiles.

Now that you know how to set up video calls, you can easily hold online meetings and discussions with your team members!


How To Schedule Meetings?

A) For desktop

  1. Select “Schedule a Meeting” (calendar icon) below the compose box.
  2. Go to “Calendar” on the left pane and click on “New meeting,” which is located at the top right.
  3. Once you’ve selected a time range in the calendar, a form will open to help you out.
  4. Add a title for the meeting, invite participants and add other details. The Scheduling Assistant can help you check everyone’s availability.
  5. Hit “Save” to complete the process. An invite will automatically be sent to each participant’s Outlook inbox!

B) For mobile

  1. Tap the Calendar at the bottom of the app and go to “Schedule a meeting” near the top-right.
  2. Tap on “Add participants” to invite everyone you need.
  3. Set the start time and end time for the meeting. Write a description as well.
  4. Tap “Done” to finish scheduling your Teams meeting!